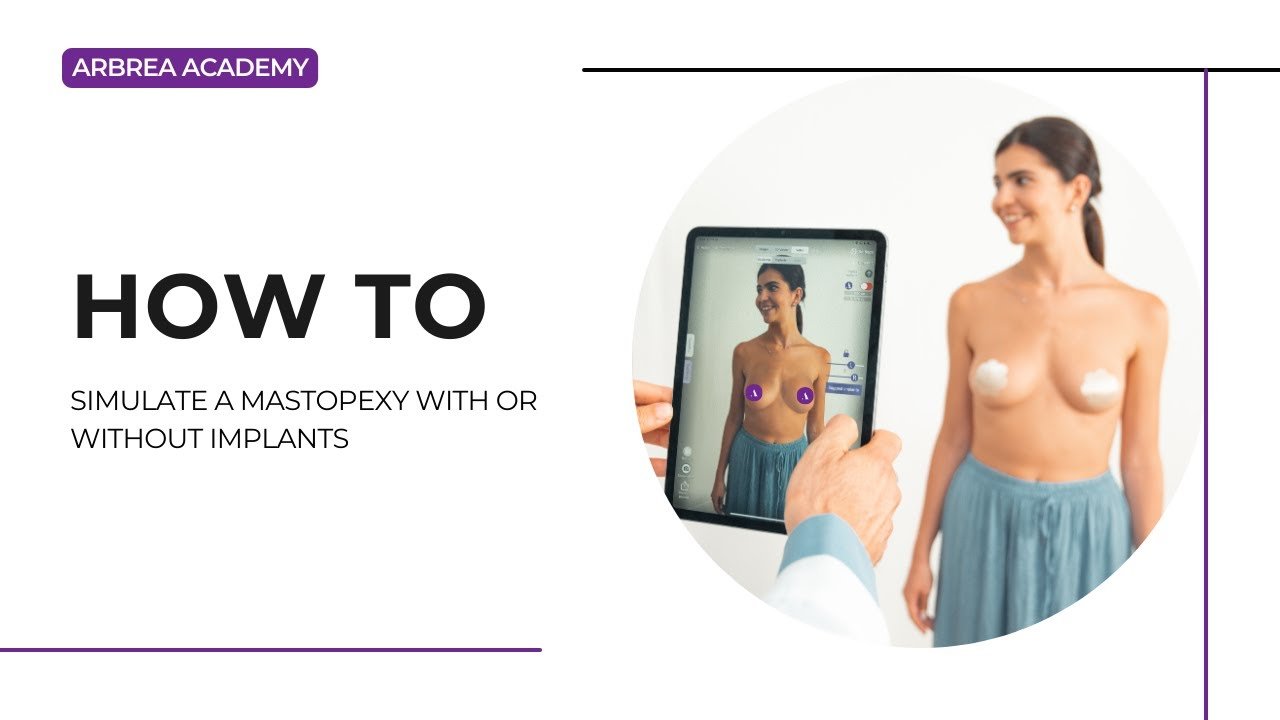
A mastopexy (breast lift) is a common procedure to restore breast shape and firmness. With Arbrea Breast, plastic surgeons can simulate mastopexy with or without implants, helping patients visualize potential outcomes before surgery.
This guide walks you through the step-by-step process of simulating a mastopexy, with or without implants, to enhance your pre-operative consultations. You will learn how to modify breast volume, refine results with additional tools, adjust the nipple-areola complex, insert scar indicators, and compare different simulations to support patient decision-making.
Simulating a Mastopexy Without Implants #
- Open Arbrea Suite and select the patient’s case in 3D Viewer.
- Reduce Breast Volume First (If Needed)
- Adjust each breast individually to maintain balance.
Going into the Second Step: Augmentation Mode #
- Click on the Shape Tool to adjust the breast lift simulation.
- Modify the breast volume by adjusting the sliders to reshape and reposition the breast.
Adjusting Volume to Achieve Desired Results #
- Increase or decrease breast volume to reflect the expected outcome.
- If additional refinements are needed, use:
- Breast Base Up Tool – Adjusts the breast’s foundation.
- Vertical Lift Tool – Simulates how the breast will sit post-surgery.
Using Additional Tools to Analyze the Case #
- If required, use distance and measurement tools to analyze:
- Breast symmetry
- Nipple positioning
- Volume distribution
Inserting Scar Indicators & Adjusting the Nipple-Areola Complex #
- Insert Scar Indicators
- Click on the Scar Indicator Tool to mark potential surgical incisions.
- This helps set realistic patient expectations regarding post-surgical scarring.
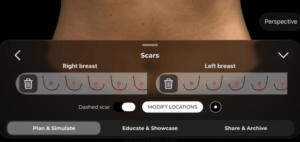
2. Modify the Nipple-Areola Complex (NAC)
-
- Open the NAC Tool to reduce or reposition the nipple and areola size.
- This reflects common mastopexy adjustments to improve proportion and symmetry.
Resetting the Simulation (If Needed) #
If you need to restart the simulation, simply:
Click the Reset button to revert to the original case.
Start a new mastopexy simulation with implants for comparison.
Simulating a Mastopexy With Implants #
- Reduce Breast Volume First (If Needed)
- Adjust each breast individually to maintain balance.
2. Simulate an Augmentation
-
- Open the Implant Catalog and select a suitable implant.
- Filter implants by:
- Brand
- Diameter
- Projection (Moderate, High, Extra High)
3. Apply the Chosen Implant
-
- Select the plane of insertion (sub-glandular, sub-muscular, dual-plane).
- Adjust the implant positioning to achieve the best outcome.
Comparing Both Simulations for Patient Decision-Making #
- Bookmark the Mastopexy Without Implants Simulation.
- Create a second simulation with implants and bookmark it.
- Compare both options side by side for the patient to review.
Conclusion #
The mastopexy simulation tool in Arbrea Breast simplifies breast lift planning with real-time volume adjustments, areola modifications, and scar visualization. By utilizing simulation refinements, comparative analysis, and interactive tools, surgeons can enhance consultations and achieve accurate pre-operative planning.
For more guidance, watch the full video tutorial below.