

Let’s be honest: most patients have already imagined their results long before they ever book a consultation. They’ve scrolled through before-and-afters, saved photos, maybe even edited a selfie or two. What they’re really looking for is a way to see themselves , and to feel safe asking the questions they’re nervous about.
That’s exactly where myArbrea comes in. In this guide, we’ll walk you through everything: what myArbrea is, how it differs from Arbrea Suite, how to set it up, how to get it in front of patients, and what to do once simulations start landing in your inbox.
What is myArbrea?
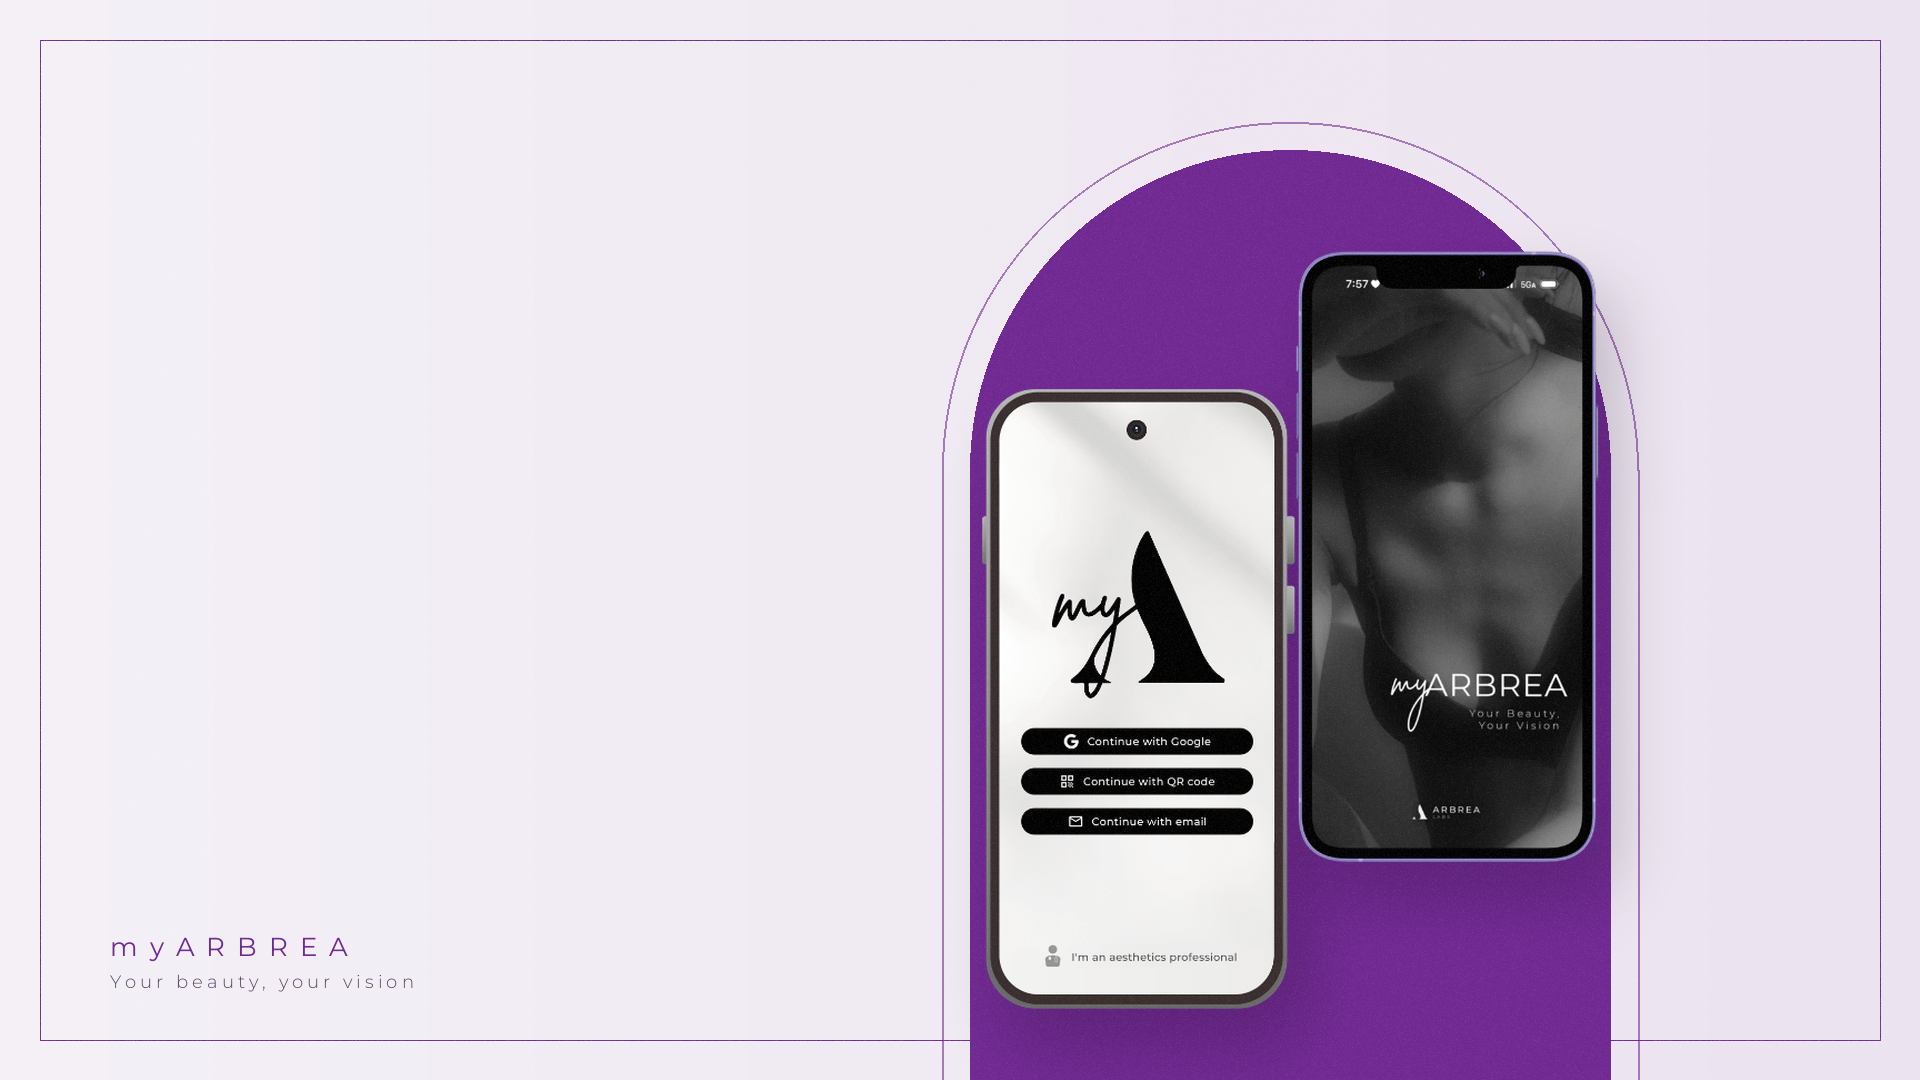
myArbrea is your clinic’s own branded app that patients use on their smartphone. It’s a white-label app built by Arbrea Labs, which means it carries your logo, your colors and your message, not ours. To your patients, it simply feels like an app from your clinic.
Here’s the idea in one sentence: patients download the app, upload a few photos, see an AI-powered simulation of their possible results, and send it straight to you. By the time they walk through your door (or join a video call), they’re informed, excited, and ready to talk seriously.
A few things that make it special:
- It’s yours. Logo, colors and content are fully customized to your practice.
- It wows patients. Arbrea’s AI and 3D technology lets them visualize face and breast results from home.
- It fits your workflow. It can connect to your booking system, so new leads land in the funnel you already use.
- It’s private. The app works offline and nothing is uploaded unless the patient chooses to share it. Arbrea doesn’t store patient data.
Think of myArbrea as your clinic’s digital front door, the first step of the patient journey, open 24/7.
myArbrea vs. Arbrea Suite: what’s the difference?
We hear this question a lot, and the short answer is: one is for your patients, the other is for you. They’re designed to work together, not replace each other.
Arbrea Suite is your clinical tool. It runs on your iPad and powers the in-depth 3D and AR simulations you do during consultations: breast, face and body, with measurements, implant catalogs and all the detail a surgeon needs.
myArbrea is your patients’ gateway. It lives on their phone, carries your branding, and lets them explore a first simulation before ever meeting you.
| Feature | myArbrea | Arbrea Suite |
|---|---|---|
| Who uses it | Your patients | You and your team |
| Where it runs | Patient’s smartphone | Your iPad in clinic |
| Branding | Fully white-label, your clinic’s look | Can be customized with your logo and colors |
| Main purpose | Attract leads, educate, pre-qualify | Detailed 3D consultations and planning |
| Access | Patient needs your clinic code | Your doctor account |
Getting started: activation and personalization
Good news: getting myArbrea up and running takes minutes, not weeks. Everything starts from the Arbrea Suite app on your iPad.
- Open Arbrea Suite on your iPad.
- Tap the myArbrea button on the main dashboard.
- Go to Settings inside the myArbrea menu.
- Tap “Create a New myArbrea Code” to request activation. If you already have a code, simply type it into the field instead.
- Watch for the confirmation. An on-screen notification lets you know your code has been created or linked.
That code is important, it’s your clinic’s unique key. Patients will enter it when they sign up, so their simulations go straight to you.
What the Arbrea team sets up for you
You don’t have to build any of this from scratch. Once myArbrea is active, the Arbrea team sets up the essentials for you, all in your clinic’s branding:
- A personalized landing page that explains myArbrea to your patients and leads them straight to the app.
- Interactive banners you can add to your website in minutes.
- Customized posts ready for your social media, so you can start promoting from day one.
All you have to do is share them with your patients.
Spreading the word on social media
Here’s the thing about social media: people scroll past ads, but they stop for something they can try. myArbrea gives your followers a reason to engage instead of just double-tapping.
Some ideas that work beautifully:
- Show it in action. A quick Reel or Story of you (or a team member) walking through the app takes 30 seconds to film and answers the “how does it work?” question instantly.
- Educate, don’t just promote. Posts explaining how patients can preview results from home position you as a modern, patient-first practice.
- Share your clinic code. Patients need it to sign up, so pin it in your bio, add it to Story highlights and mention it in captions.
- Put the link where it’s easy to find your bio link, highlights, and the CTA on any ad you run.
- Turn it into a lead magnet. Offer a free virtual pre-assessment through myArbrea for a limited time, or as a perk for newsletter sign-ups.
- Use relevant hashtags like #myArbrea, #AestheticSimulation and your procedure and city tags.
One gentle reminder: platforms like Meta have rules around aesthetic and medical ads, so keep promotional content focused on the experience and education rather than guaranteed outcomes.
What your patients actually do
We designed the patient side to be as simple as possible because a nervous patient shouldn’t have to fight with an app. Here’s what their journey looks like:
- Download myArbrea from the App Store or Google Play.
- Enter your clinic code. This is what connects them to you. No code, no access which keeps the experience private and personal to your clinic. If they don’t have it, they can find it on your social media or ask your team.
- Take a few photos following the on-screen guidance.
- See their simulation. Arbrea’s AI shows them a preview of possible results for face or breast procedures.
- Share it with your clinic when they’re ready. Nothing leaves their phone until they choose to send it.
A small tip: let patients know they can revisit their simulation any time. Many like to show it to a partner or a friend before booking and that conversation often brings them back to you.
Checking your myArbrea contacts
Every patient who shares their details through myArbrea becomes a warm lead, someone who has already seen a simulation and is curious about working with you. The key is not letting them go cold.
From the Surgeon web portal
Log in to the Surgeon Platform from any computer, open the myArbrea area and go to Contacts. You’ll see everyone who submitted their information, so your front-desk team can follow up without needing the iPad.
From Arbrea Suite on your iPad
- Open Arbrea Suite.
- Tap the myArbrea button on the main menu.
- Go to the Contacts tab.
- Reach out to each patient using the name, email or other details they shared.
A quick, personal follow-up makes a huge difference. Something as simple as “Hi Anna, we saw your simulation — would you like to talk it through with Dr. X?” can turn curiosity into a booked consultation, and helps reduce no-shows too.
You’ve received a simulation, now what?
This is the exciting part. When a patient shares their case through myArbrea, it travels straight to your linked Arbrea Suite account. No email attachments, no downloading files, no chasing photos.
- Open Arbrea Suite on your iPad.
- Find the case in your patient list. Shared myArbrea cases appear there automatically.
- Open it and pick up where the patient left off. Their photos and first simulation are already in place.
- Refine it. Use the full Arbrea Breast or Arbrea Face tools: implants, volume, shape, rhinoplasty, facelift and more, to build a detailed, realistic plan.
Because the photos are already there, you skip a big chunk of in-clinic imaging time. You can review the case before the visit, or open it live during a video call or in-person consultation so you’re talking about the same picture together.
Sharing the simulation back with your patient
The conversation doesn’t end in the consultation room. Once you’ve refined a simulation, you can send it right back to your patient’s myArbrea app, so they can look at it again at home, in their own time.
- Open the case in Arbrea Suite from your Patient List, or start a New Patient.
- Finish your simulation in Breast, Face or Body mode, making any real-time adjustments you want.
- Tap the Share button at the bottom of the screen.
- Choose to share directly to myArbrea. The simulation lands in the patient’s myArbrea account.
Why does this matter so much? Big decisions take time. Patients often want to sit with their results, show their partner, or simply look again before saying yes. Giving them your refined simulation keeps you top of mind, builds trust, and helps reduce no-shows for the next appointment. It’s also a lovely tool for remote follow-ups.
Beyond leads: building a 3D before-and-after library
myArbrea isn’t only about bringing new patients in. Many clinics also use it to keep a visual record of their patients’ journeys, all in one place.
Imagine having, for each patient, their original photos, the 3D simulation you planned together, and their real result after the procedure. That’s a powerful library to have:
- For follow-ups: compare the plan with the outcome side by side and show patients how far they’ve come.
- For your own practice: review your cases over time and spot what works best.
- For future patients: with consent, real before-and-after cases are some of the most convincing content you can share.
And because Arbrea never stores patient data on its servers, you stay in control of your patients’ images the whole way.
Ready to open your clinic’s digital front door?
Your patients are already imagining their results. myArbrea simply lets them do it with you, in your colors, with your name on it, and with a direct line back to your team.
If you’re already using Arbrea Suite, you can activate myArbrea in just a few taps. If you’re new to Arbrea, we’d love to show you around.
Get myArbrea for your practice · Book a demo · Visit the Arbrea Help Center




 English
 Portuguese
 Italian
 Spanish
 German
 Arabic
 French
 Korean
 Albanian
 Thai
 Hindi
 Vietnamese
 Japanese